Showing posts with label dessert. Show all posts

Saturday, July 18, 2020

Make This! Mason Jar Lid Mini Pies & Blueberry Hand Pies


I found these cute mason jar lid pies last 4th of July & had to make them again this year. Omid and I went blueberry picking on the 3rd and picked 20 pounds of blueberries. I baked the mason jar lid pies and then decided to try to make mini hand pies. I used the same filling recipe as Living the Gourmet uses for the mason jar lid pies.  I like my own pie crust recipe (from my sister B) and used that instead as it's super easy to make(in a mixer!) and tastes delicious on it's own. The recipe is below.


For the mason jar lid pies, place the lid upside down in the ring.


I used a 4" round biscuit cutter and cut out an additional 1" beyond with a knife to fit the dough in the rings. Last year, I pre-baked the pie shells, but they shrunk too much. This year, I did not pre-bake the shells. The pie crust was baked all the way through and most importantly, no shrinkage.  One pie crust recipe was enough for 6 mini pies.

For the hand pies, definitely double the pie crust and filling recipe. You will be glad you did! 

I used the 4" biscuit cutter. I was only able to get about 4 blueberries in each pie, as my berries from Meadowglenn Farm are each about the size of a quarter! No joke!

Once filled, brush egg white on the edges and pinch together, then seal with a fork. Place one slit in the top for steam to escape. I also brushed beaten egg yolk on top (it was leftover from the egg white and I didn't want to waste it).  


Bake on parchment paper at 400* for 15-20 minutes. Brush the vanilla glaze on the hand pies while they are still warm.


*Note:The last time I made these, I pre-cut all the pie shells in advance, then filled and baked the pies.  This made the whole process move a lot quicker. :)

Pie Crust (for one pie crust - double the recipe for a two crust pie)
1 1/4 cups flour
1 Tbs. sugar
1/4 tsp. salt
3 Tbs. ice cold water
8 Tbs (one stick) cold butter, cut into 16 pieces
In a stand mixer, mix flour, sugar & salt. Add the butter & toss into the flour mixture until coated. Mix on medium low until the mixture resembles coarse cornmeal with the butter pieces no larger than small peas. Add the water & mix until the dough just comes together. Wrap tightly in plastic wrap & let the dough rest in the refrigerator for 15 minutes before using. 

Blueberry Filling via Living the Gourmet
1 cup blueberries
1 tablespoon vanilla - I only used 1 teaspoon
2 tablespoons brown sugar- I only used 1 TBS as my berries were super sweet already.
1 tablespoon cornstarch

Vanilla Glaze
1 cup powdered sugar
1 tsp vanilla
1 tsp lemon juice (or more to thin glaze)

Sunday, February 28, 2016

Make This! Tasty's Sugar-Glazed Apple Tart

If you have a Facebook, chances are you have seen one of Buzzfeed's Tasty videos. They are adorable & quick 'how to' food videos set to fun music.  I happened to see Tasty's video for a sugar-glazed apple tart yesterday and just had to make it.

Tasty didn't lie: it was easy, quick & delicious! 

Make one today!!


Apple tart before...

Apple tart after!

Sunday, March 1, 2015

Sunny Saturday!

Another beautiful 60* day in February! We have been so lucky this past month, while the Midwest & East suffer.  I can't remember the last time we had such a dry & sunny winter. The forecast for the coming week looks beautiful too. Thank you, God! ☺

Omid and I took full advantage of the sunshine. We worked outside in the yard for a bit and on the boat; then decided we better eat at Lardo. We've been meaning to go for weeks, but never had the time. And wouldn't you know, Alton Brown came to town last week and beat us to Lardo. We were so mad that the Food Network star beat us to the punch! Oh well, better late than never! That being said, have you been? If not, go! This is my new favorite place and I can't wait to go back.


Waiting for our lunch in the gorgeous sunshine, with a Boneyard IPA. Nothing better!

Omid got the Pho'Rench dip (to die for!) & I got the pork meatball bahn mi. Very good, too, but not as tasty as Omid's.


But wait! There's more!!
We forgot to order the 'dirty fries' and had that after our sandwiches. This may have been a mistake. These are a meal on their own. Good, but next time I'll stick with the sandwiches.
 
By this time, we were so full, we walked up Hawthorne to try and feel better. We stumbled upon this guy....What do you think he said to Omid?!


After walking a bit, we decided we needed to finally try Salt & Straw. We drove to 23rd and walked along there for a while. Right before Salt & Straw, we saw our old friend Papa Haydn. We made the decision to visit memory lane instead of Salt & Straw. Papa Haydn it was!
For the last 20 years, I have ONLY ever ordered panna cotta at Papa Haydn. It's the best and is not to be missed. Of course, it pairs nicely with an Italian muscati. Omid got the bourbon ball (chocolate mousse with bourbon). So dense!

YUM!

Our neighbor at Papa Haydn. ♥

Sunday, February 8, 2015

Make This!!

Do you like chocolate? Do you like banana bread? Then you will LOVE this recipe for Greek yogurt chocolate chip banana bread from the Lovely Little Kitchen.


I saw this recipe on Friday via Facebook and definitely wanted to make it this weekend. I recently threw out my mini loaf pans from when Nas & Matty were young. The pans had seen better days and were definitely done with baking.
I picked up these name brand mini loaf pans at Winco for $1.98 each.

I got up early this morning and baked the loaves plus a side of bacon for breakfast.
The results: YUM!

NOTE: I used dark chocolate chips as those are my favorite!
 

Wednesday, May 28, 2014

Senior-Mother Tea & a Recipe Too!

Today marked the countdown for Matty's upcoming HS graduation. It was the Senior-Mother Tea. It was a super fun event and so wonderful to see all the kids & their moms today. I still remember so many of  these 17 & 18 year olds as Kindergarteners! Time flies!!!!!
 
Matty & I
Hi Lee!! It was so fun to see Lee Ellen & Meredith & talk about our Foxy friends today.

Matty & I with his adorable girlfriend, Alyssa & her mom, Valerie.
Aren't they the cutest couple?!
 

Not so fun fact: I rode in with Matty to school today. On the way, I had a sneezing fit and actually tweaked my back. Thank the Lord for muscle relaxers & tens machines!

After resting my back, I baked these yummy monster cookie bars. So easy & so delish! They are not 'clean' so I will pay for eating these later.

Easy Monster Cookie Bars via Better Homes & Gardens
1 16.5 oz roll refrigerated peanut butter cookie dough
3/4 cup rolled oats
1 cup M&M's candy
1/2 cup chocolate chips
1/2 cup chopped peanuts

Preheat oven to 350*. Line a 9x13 pan with foil & grease lightly. Break up cookie dough into a large bowl. Add oats, M&Ms, chocolate chips & peanuts. Mix well.
Pat the dough into the prepared pan. Bake for 20 minutes or until golden brown. Cool in pan and cut into bars. Enjoy!


Sunday, March 2, 2014

Make This!!!

  
Banana Cake with Cinnamon Buttercream Frosting!

It's no secret that we love banana flavored desserts in our house: banana bread, banana cream pie, banana tarts, monkey bars. These desserts are all on a regular rotation here.

While looking for a new way to incorporate bananas in our dessert line up, I came upon this yummy sounding cake on Pinterest. It was everything I hoped it would be and more!

We are not big fans of buttercream frosting. We either scrape it off or eat the cake around it, leaving a frosting shell on the plate. The cinnamon buttercream intrigued me enough that I was willing to sacrifice a cup of butter for the cause. The result: GOOD STUFF!

Make this cake! It's delicious and everyone will be oohing and ahhing over how delicious it is; and also wonder why didn't they think to bake banana bread in cake pans and frost it with cinnamon buttercream!?

Note: The cake batter is very dense, even more so than banana bread batter as there is no milk in it. I used cake flour instead of all purpose flour to give it more of a cake-like consistency.

Banana Cake with Cinnamon Buttercream Frosting by Shugary Sweets

1/2 cup butter, softened
1 cup sugar
1 egg
1 tsp vanilla
3 bananas
1 3/4 cups flour
1 tsp baking powder
1 tsp baking soda
1/2 tsp salt

Frosting:
1 cup butter, softened
3 1/2 cups powdered sugar
2 tsp cinnamon
2-3 T milk

Preheat oven to 350*. Grease two 9 inch cake pans.


Blend butter and sugar until creamy. Add egg and vanilla, beat until combined. Blend in bananas. Add in flour, baking powder, baking soda and salt.


Divide batter in half and pour into cake pans. Bake in a 350 degree oven for 25 minutes. Remove and cool. Let cake cool in pans 10 minutes, then flip onto a cooling rack to cool completely.

For the frosting, beat butter until fluffy. Add in powdered sugar and cinnamon. Add milk. Beat for 5 minutes until desired consistency.

Frost, eat & enjoy!


Friday, December 20, 2013

Make This!!!

 
Raspberry Shortbread Bars!
 

These bar cookies are the perfect treat to take to a holiday potluck or add to your Christmas cookie tray.

I have made three batches in the last 24 hours. One as a tester, to make sure they were tasty (they were!!!) and two batches for work/school potlucks today.

Make these cookies!

Raspberry Shortbread Bars via The Baking Bargainista

2 1/4 cup flour
1 cup sugar
1 cup butter
1 egg
pinch salt
1/2 cup + 2 ounces raspberry jam

Preheat oven to 350*. Line a 9x9 pan with foil, and grease it lightly. Mix all ingredients except for the jam until well combined. Put 4/5 of the shortbread dough into the foil. Pat it down until you have an even crust. Spread  6 oz. of raspberry jam over the dough. Use more than you think you need! If you skimp on the jam, it will thin out too much and look watered down. Trust me on this! Take the remaining dough, tear off little chunks and sprinkle it evenly over the jam. Bake for 40 minutes or until the top is slightly golden. Let cool & cut into squares. Enjoy!
**I used a 9x13 pan instead of a 9x9 pan. I also over baked my first batch, as I didn't think they were done. They were! Make sure you take the shortbread out after 40 minutes!

Monday, December 9, 2013

Make This!!!


Dream Bars!

 
This recipe is an oldy, but a goody. I switched out the Crisco for coconut oil to make it a 'tad' bit healthier. I'm so glad I did! The shortbread crust tastes so buttery/coconutty.  Make these today! They bake up in no time at all.
 
Dream Bars
 
1/4 c coconut oil
1/4 c butter
1/2 cup brown sugar
1 cup flour

Preheat oven to 350*.  Mix coconut oil, butter & sugar together. Add flour.  Flatten into bottom of ungreased 13x9 pan. Bake 10 minutes. Spread with almond coconut topping.
 
 2 eggs, well beaten
1 cup brown sugar
1 tsp vanilla
2 Tbs flour
1 tbs baking powder
1 tsp salt
1/2 cup slivered almonds
1/2 cup shredded coconut
 
Mix eggs, sugar & vanilla. Add flour, baking powder and salt. Stir in coconut & almonds.
Return to oven and bake for 20-25 minutes.
Cool and cut into bars.

Wednesday, November 13, 2013

Make This!!!


I found this recipe in the current issue of Kraft’s Food & Family Magazine. It is a winner! These bar cookies are perfect for a party or potluck and keep well for several days, if they last that long!

Gingerbread Caramel Bars
Serves: 36 bars
1pkg.  (2-layer size) spice cake mix
2tsp.  ground ginger
1/2cup  butter, melted
1 egg
35 KRAFT Caramels
1 can  (5 oz.) evaporated milk
1 pkg.  (4 oz.) BAKER’S White Chocolate, coarsely chopped, divided
 
Preheat oven to 350ºF.

Line a 13×9-inch pan with foil, with ends of foil extending over sides; spray with cooking spray.  Beat cake mix, ginger, butter and egg with mixer until blended.  (Dough will be stiff.)  Press 2/3 of the dough onto bottom of prepared pan.

Bake for 10 to 12 min. or until lightly browned.  Meanwhile, microwave caramels and milk in microwaveable bowl on HIGH 3 to 3-1/2 min. or until caramels are completely melted and sauce is well blended, stirring after each minute.

Drizzle caramel sauce over baked layer in pan. Reserve 2 Tbsp. chopped chocolate; sprinkle remaining over caramel sauce. Crumble remaining gingerbread dough over dessert. Bake 25 to 30 min. or until center is almost set. Cool completely.

Microwave reserved chocolate in microwaveable bowl on HIGH 30 sec. to 1 min. or until completely melted, stirring every 30 sec.; drizzle over dessert.  Let stand until chocolate is firm.  Use foil handles to lift dessert from pan before cutting into bars.

Note: I will leave the white chocolate out next time and just keep it as a drizzle. I felt the taste of the chocolate competed with the caramel.
Update! I made these again last night and substituted pumpkin pie spice for the ginger. Wow! It made the cake so much spicier.☺

Sunday, September 22, 2013

Make This!!


Gingerbread Muffins!


Fall has officially arrived here in SW Washington. It hit us with a bang: wind, rain, and just plain cold.  It seemed more like early November weather than the beginning of fall. I already miss the gorgeous summer weather we had. Today's weather definitely called for something sweet & comforting like gingerbread.☺

The recipe I used was found on the Foodie Bride blog. Everything I have ever made from her blog is excellent! These muffins were more cake like than heavy & bready. They were simply divine. I am already planning to bake another batch on Wednesday. Instead of boring cupcake liners, I tried making liners out of parchment paper and I think they upped the cuteness factor by a lot.☺

Gingerbread Muffins by Confessions of a Foodie Bride

  • 2 3/4 cups all purpose flour
  • 2 1/2 tsp baking soda
  • 1 Tbsp ground ginger
  • 1 tsp ground cinnamon
  • 1/4 tsp ground cloves
  • 1/4 tsp ground allspice
  • 1/2 tsp nutmeg
  • 1/4 tsp fresh ground black pepper
  • 1/2 teaspoon salt
  • 1/2 cup unsalted butter, room temp
  • 1/2 cup packed dark brown sugar
  • 2 large eggs
  • 3/4 cup molasses (I used Mother's brand)
  • 3/4 cup fat-free Greek yogurt (I used full fat!)
  • Coarse sugar for garnish

  •  
    Preheat oven to 375.
    Line a muffin pan with paper liners or spray with non-stick spray.
    In a medium bowl, whisk together the dry ingredients: flour, baking soda, ginger, cinnamon, cloves, allspice, nutmeg, salt, and pepper. Set aside.
    Cream the butter with brown sugar until light and fluffy, 3-4 minutes. Add the eggs, one at a time until mixed well.  Add the molasses and mix until well blended. Add half of the dry ingredients, mixing on low until just incorporated and add the yogurt. Mix until the yogurt is well distributed and add the remaining dry ingredients. Mix on low only until the flour just disappears. Scoop into the prepared muffin pan and sprinkle coarse sugar over the tops of the muffin batter. Bake 5 minutes and then reduce the oven temperature to 350. Bake another ~15 minutes, until a toothpick comes out clean.  Cool 5 minutes in the pan and then turn out onto a wire rack to cool completely. Store in an airtight container for 3-5 days. This batter makes about 15 muffins. Do not overfill the muffin liners, or the gingerbread will come out flat & sloppy looking.

    Sunday, September 8, 2013

    Make This!!

    Wafeltjes

    aka: Belgian Waffle Cookies!


     I found this recipe on the blog, Jillian in Italy (via Pinterest). These cookies looked so delicious, I had to make them. Will I make them again? Probably not. They were extremely time consuming, since the batter made a lot and I didn't have the foresight to only make half a recipe. I ended up giving half the cookies away and we still had tons leftover. These cookies also have 3+ cubes of butter in them (yes, THREE!) and six eggs. Not the healthiest. :/


     Whip up half the recipe (trust me on this: only make half a recipe, unless you are feeding a crowd), heat up your waffle iron, cook, then eat!

    Since this recipe is in grams, I used my handy kitchen scale & weighed the ingredients in grams. If you don't have a kitchen scale, you can type the grams into this website and it will convert the recipe into cups for you.

    Wafeltjes by Jillian in Italy
    500g pastry flour ( I used a 50/50 mix of cake flour & all purpose flour)
    400g butter
    300g sugar
    6 eggs
    1/2 tsp baking powder
    1 vanilla bean (or 1 tsp vanilla extract)
    pinch of salt
    1. Gently melt the butter (make sure it doesn’t color).
    2. In the bowl of your mixer put in the flour and sugar.  Add the baking powder, salt  and the scraped out seeds of the vanilla bean (or the tsp of vanilla extract).
    3. Mix on medium low speed and slowly add the eggs one at a time.  Let mix for one minute then slowly pour in melted butter.
    4. Cover bowl and put in fridge for at least one hour.
    5. After letting the dough sit in fridge heat up waffle iron.  Make small balls of dough and drop onto waffle iron. My batter was still slightly fluid like regular waffle batter & I was not able to make balls of dough.
    6.Let bake until golden brown and remove from iron with wooden skewer onto a cooling rack.  Store in covered container.  Makes: a lot!

    Monday, August 5, 2013

    Make This!!

     
    Homemade Ice Cream Sandwiches!
     

    I love a good ice cream sandwich, but are full of processed ingredients I can no longer eat. Enter the King Arthur Flour blog with the perfect solution: easy homemade ice cream sandwiches.

    I already had the ice cream, so I whipped up a batch of the chocolate cookies (15 mins from start to finish). I am not a chocolate fan at all, but these cookies were good. Matty & I nibbled on the extras with a cold glass of milk. The hardest part was waiting for the cookies to firm up after filling them with ice cream.☺

    Make these! They are soooo tasty! Click this link to visit the KAF blog and find the recipe. They have many helpful step by step photos.

    Monday, July 29, 2013

    Make This!!!


    Blueberry Pie Bars!


    This recipe for berry pie bars is a winner! Sweet with a subtle hint of cinnamon and a deliciously flaky crust. These bars are perfect for a picnic, office potluck or for dessert at home. The recipe comes from The Novice Chef blog. These bars came together in no time and didn’t bubble over onto my oven floor (yay!). I am already planning to bake a second batch for later this week. ☺

    Blueberry Pie Bars adapted slightly from The Novice Chef
    3 cups flour
    1 1/2 cups sugar, divided
    1 tsp baking powder
    1 tsp cinnamon
    1/4 tsp salt
    zest & juice of one lemon
    1 cup (2 sticks) butter cut into 1 inch slices
    1 large egg
    2 tsp vanilla
    4 cups fresh blueberries (or blackberries)
    4 tsp cornstarch

    Preheat the oven to 375*. Grease a 9×13 pan. In a food processor, pulse together flour, 1 cup of sugar, baking powder, cinnamon, salt & lemon zest. Add the butter, egg and vanilla extract. Pulse until the dough is crumbly. Pat half of the dough into the bottom of the prepared pan, saving the remaining dough for the topping.

    In a medium size bowl, stir together the remaining 1/2 cup sugar, cornstarch and lemon juice. Gently mix in the berries. Sprinkle the berries over the crust. Crumble the remaining topping dough over the berry layer.

    Bake in a preheated oven for about 35-45 minutes (depending on your oven) or until the top is slightly brown (you are only looking for the top to slightly brown, if you cook for too long, the bottom will burn).

    Cool completely before cutting into squares. Store in an airtight container.

    Thursday, July 25, 2013

    Mini Blueberry Pies


    Blueberries are nature's candy and summer has given Vancouver a bounty of beautiful blueberries this year. In the past three weeks, I have picked just under thirty pounds. What to do with all these berries? We ate most (so good for us!), I froze a few pounds and the rest I have baked into fruit crisps or mini blueberry pies. In fact, I have baked these mini blueberry pies 3 times in the last 4 days. They are that good! We are eating them for breakfast, snack & dessert. True story!☺

    The berries I've picked are so incredibly sweet, only a tablespoon of sugar is required (if at all) compared to what most cookbooks recommend: 1 full cup. I never add the full amount of sugar, as I think the pie would be way too sweet to eat and a waste of good berries. But if you have a major sweet tooth, then by all means - add the full amount of sugar!

    I like to bake my individual pies in a muffin tin. I also use a two crust pie recipe to have enough pie to top the pies and have enough pie crust left over to make some cinnamon-sugar topped pie crust cookies. Better to have too much pie crust than not enough!☺

    Mini Blueberry Pies
    1 recipe for a two crust pie
    4 cups fresh blueberries
    1 Tbs lemon juice
    1 Tbs sugar
    2 Tbs flour
    1 egg, whisked with 1 tsp of heavy cream, for an egg wash
    Turbinado sugar

    In a medium size bowl, toss blueberries with the flour, sugar & lemon juice. Set aside. Make your pie crust & cut with a biscuit cutter or large glass to fit the size of your muffin tin. Press the pie crust firmly into each muffin cup. Fill each mini pie with approximately 1/4 cup of berries. Top each individual pie with a crust & press firmly to seal.  Brush each pie with the egg wash & sprinkle turbinado sugar over the top. Bake in a 375* oven for 35-40 minutes, or until the pie crust is a golden brown and the berries are bubbling. Let cool for a bit then serve with whipped cream or vanilla ice cream. Enjoy!

    Monday, July 22, 2013

    Make This!!

    Pie Crust in a Mixer!
     
    We have been doing so good (since March!!) on our diet of eating little to no processed foods. I wanted to bake a pie today and always use Pillsbury ready made pie crusts. Why? They are convenient & always bake to perfection. Today though, that wasn't an option, since they are processed. I called my sister Brenda who bakes pies all the time. She told me her secret & that is to make the pie crust in a mixer. I was dubious, but tried it. How did it turn out? Perfect! The dough was similar to a sugar cookie dough. I plan to always make my pie crusts this way from now on. Thanks, B!☺
     
    Mini blueberry pies before...

    ...and after!
    

    Pie Crust (for one pie crust - double the recipe for a two crust pie)
    1 1/4 cups flour
    1 Tbs. sugar
    1/4 tsp. salt
    3 Tbs. ice cold water
    8 Tbs (one stick) cold butter, cut into 16 pieces
     
    In a stand mixer, mix flour, sugar & salt. Add the butter & toss into the flour mixture until coated. Mix on medium low until the mixture resembles coarse cornmeal with the butter pieces no larger than small peas. Add the water & mix until the dough just comes together. Wrap tightly in plastic wrap & let the dough rest in the refrigerator for 15 minutes before using. 
    

    Thursday, June 27, 2013

    Make This!!

    Carrot Cake!
     

    Omid & I LOVE a good carrot cake. I like mine with raisins & pecans, Omid likes his without either of those ingredients. I scoured Pinterest the other night for recipes that I thought Omid would like & came up empty.

    I finally turned to the two bloggers I always visit when I need a great recipe: Noble Pig & The Pioneer Woman.  Cathy from Noble Pig had several carrot cake recipes on her blog. The one I can't wait to make is apple carrot cake with goat cheese frosting. Sounds simply scrumptious! I finally decided to go with Ree's simple carrot cake. Just the basics, nothing fancy.

    I made two changes with Ree's recipe. I substituted coconut oil for the vegetable oil. I was really nervous about how it would turn out.  It actually turned out great! I also cut the powdered sugar amount down from one pound to 1.5 cups in the frosting. We like our cream cheese frosting more tangy than sweet. In my opinion, nothing ruins a carrot cake than super sweet cream cheese frosting. I also left the pecans out of the frosting & just sprinkled them on top of individual slices instead of all throughout the cake.


    This cake got two thumbs up from Omid. ☺ Make it! You won't be disappointed!

    Coconut Oil Carrot Cake adapted slightly from Ree Drummond
    2 cups Sugar
    1 cup Coconut Oil
    4 whole Eggs
    2 cups All-purpose Flour
    1/2 teaspoon Salt
    1 teaspoon Baking Soda
    1 teaspoon Baking Powder
    1 teaspoon Ground Cinnamon
    2 cups Grated Carrots

    Cream Cheese Frosting
    1 stick Regular Butter, Softened
    1 package (8 Oz) Cream Cheese
    1 1/2 cups Powdered Sugar
    2 teaspoons Vanilla
    1 cup Pecans, Chopped Finely

    Preheat oven to 350F.
    Mix together the sugar, coconut oil and eggs in a large bowl. In another bowl sift together flour, salt, baking powder, baking soda and cinnamon. Add to first mixture and combine. Then add carrots and mix well. Pour into a greased and floured pan  and bake at 350F until done (insert a toothpick), about 50 minutes.  Cool completely.

    Frosting:
    In larger bowl, cream butter and cream cheese. Add sugar and vanilla and blend. Spread on cooled carrot cake. Sprinkle nuts on top or onto individual servings.

    Thursday, May 30, 2013

    Make This!!!

     
    Banana Brownies a.k.a. Monkey Squares!


    These are my new favorite baked item to take to potlucks. These brownies are so tasty! Much moister than banana bread with a browned butter frosting and oh so delish!  They bake up in no time & the frosting comes together pretty quickly too. I found the recipe via The Girl Who Ate Everything. Just click on the link for the recipe.

    Make these! You will be so glad you did!

    Note: I sprinkled mine with a little cinnamon. My kids also like these brownies stored in the fridge, while Omid & I prefer them at room temperature. Either way, these are a winner!☺

    Wednesday, April 10, 2013

    Make This!!

    Dark Chocolate 'No Bake' Bars
    aka...really, really, really good fudge!

    These are sinfully good. I am not a chocolate fan at all, but I liked these. A lot. The peanut butter/honey combination makes an almost chewy caramel & the dried cranberries compliment the chocolate nicely.

    It's a really simple recipe & takes just minutes to assemble.
    Yummy mix-ins
    Make these! You will be so glad you did!

    Note: This fudge needs to be refrigerated! Once it sits out longer than ten minutes, it softens to an icky mess. Trust me on this!☺

    The Best No Bake Bars via I Hear Exercise Will Kill You
    1/2 c peanut butter
    1/2 c honey
    1/2 c coconut oil
    2 cups old fashioned oats
    1/2 c shredded coconut
    1 1/4 c dark chocolate chips
    1/2 c dried cranberries
    1 tsp vanilla

    Melt peanut butter, honey and coconut oil over medium-low heat. Once melted, remove from heat and add oats, coconut, chocolate chips and vanilla. Stir until chocolate is melted. Pour into a 9x13 pan and cool in the fridge. When it's set, cut into bars and enjoy.

    Update! I made these again with a few adjustments. I increased the peanut butter to 1 cup and replaced the oatmeal with 2 cups of broken pretzels. WOW!  I also used an 8x8 pan instead of a 9x13 as I like the thicker pieces. ☺


    Wednesday, April 3, 2013

    Make This!!

    Honey Bread!
     
    This is an excellent bread. It might even be more of a cake than bread. It all depends if you want to serve it for breakfast or dessert. My favorite way to eat this bread is lightly toasted with a generous pat of butter.☺

     
    There is a little bit of history that goes with this recipe. Whenever I see this blue card in my recipe box, I automatically think of the girl that introduced it to me. Her name is Patti and she was the first friend I made at WSU. I first tasted this bread when Patti's parents mailed her a care package & she shared some of this yummy treat with me.   Sadly, we have since lost touch, but she is always on my mind whenever I bake this bread.
     
    Make this bread! It's delicious and oh so easy!
     
    Honey Bread
    3 1/2 cups flour
    1 tsp baking soda
    1/2 tsp salt
    2 tsp cinnamon
    1 cup brown sugar
    1 cup honey
    1 cup milk
     
    Mix flour with soda, salt & cinnamon. Add brown sugar & mix well. Beat honey & milk in a separate bowl until well blended. Add gradually to dry ingredients until just free from lumps. Bake in a well greased loaf pan 2 1/4 hours in a 250* oven. Store two days before serving. Makes 1 large or two small loaves. Freezes well.
    *NOTE: If you notice the bread is not rising fast enough, increase the oven to 300*. We have NEVER been able to wait the two days before serving!☺

    Sunday, February 17, 2013

    Make This!!

     
    Ritz Cracker/Rolo Cookies!
     
    These cookies take 10 minutes max (including unwrapping the Rolo candies).
    Preheat oven to 250*.
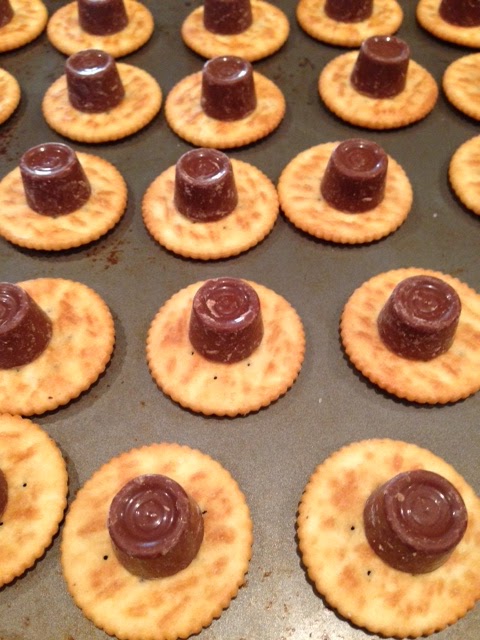
    Place one sleeve of Ritz Crackers on a baking sheet. Put an unwrapped Rolo candy on each cracker.

    Bake for 6 minutes (NO MORE, NO LESS), remove from the oven & cover the Rolo with another Ritz Cracker (press down gently!).


    I dare you to eat just one!